The AI Image Generation feature in DigiBlocks Pro allows you to create stunning, custom images directly within the WordPress block editor using OpenAI’s powerful image generation models. This feature eliminates the need for external design tools or stock photo searches, enabling you to generate unique images on-demand based on text descriptions.
Configuring AI Image Generation
Before you can use the AI Image feature, you need to configure it in your WordPress admin panel.
Navigate to Settings
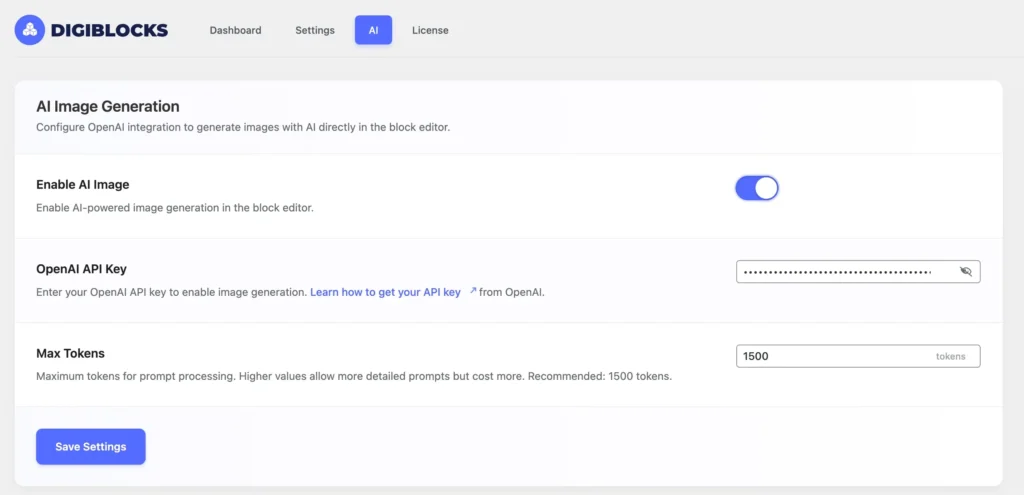
Go to DigiBlocks > Settings and click on the AI tab.
Enable AI Image Generation
Toggle the Enable AI Image switch to activate the feature. This will enable the AI image generation toolbar button in supported blocks throughout the block editor.
Add Your OpenAI API Key
To use AI image generation, you’ll need an OpenAI API key:
- Visit OpenAI’s API Keys page and create an account if you don’t have one
- Generate a new API key from your OpenAI dashboard
- Copy the API key (it will start with “sk-“)
- Paste it into the OpenAI API Key field in DigiBlocks settings
- Click the eye icon to toggle visibility if you need to verify the key
The API key is stored securely in your WordPress database and is never exposed to the frontend.
Configure Max Tokens
The Max Tokens setting controls the maximum number of tokens used for processing your image prompts. Tokens represent pieces of text that the AI uses to understand your request.
Default value: 1500 tokens Range: 50 – 4000 tokens
Higher token values allow for more detailed and complex prompts, but they will consume more of your OpenAI API credits. For most use cases, the default value of 1500 tokens provides an excellent balance between prompt detail and cost efficiency.
Save Settings
After configuring your API key and token settings, click Save Settings to store your configuration.
Using AI Image Generation
Once configured, the AI Image feature becomes available in the following blocks:
DigiBlocks Image Block – Generate custom images for your content with various settings
Core Image Block – Generate images in WordPress’s default image block
DigiBlocks Container Block – Generate background images for containers
DigiBlocks Column Block – Generate background images for columns
Accessing the AI Image Generator
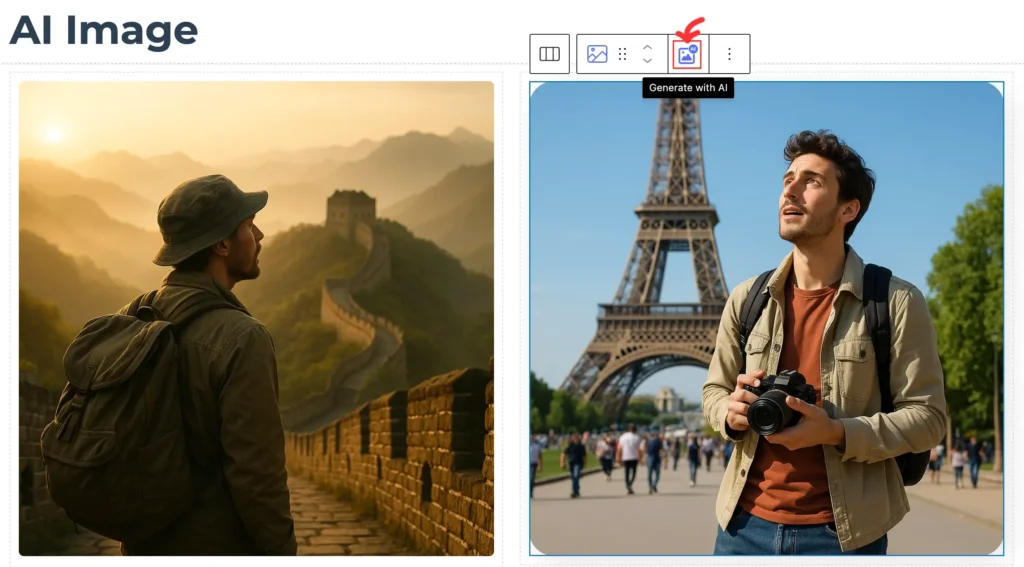
- Add any supported block to your page or post
- Look for the AI icon in the block toolbar at the top of the block
- Click the Generate with AI button to open the AI Image modal
The button features a distinctive AI icon with a blue accent, making it easy to identify.
AI Image Generation Modal
The modal is divided into two main sections: settings on the left and results on the right.
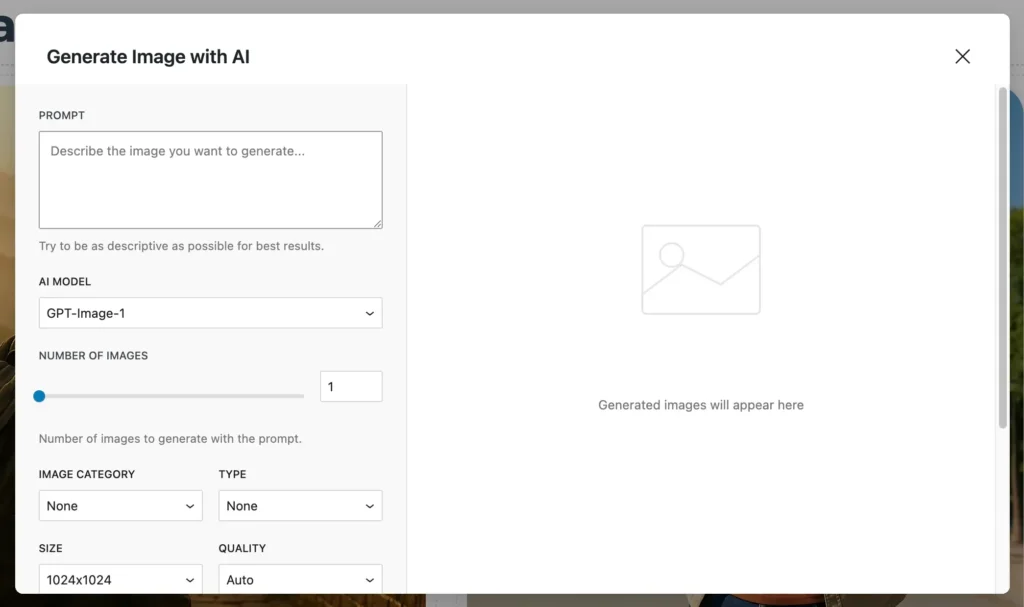
AI Image Settings
Prompt
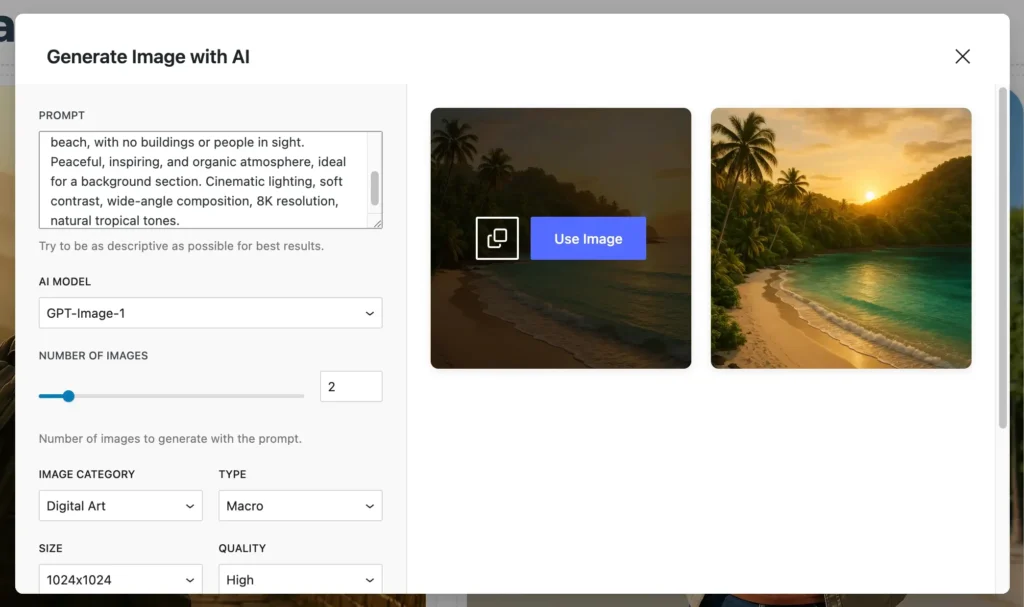
The prompt is the most important setting for generating images. This is where you describe the image you want to create.
Best practices for prompts:
Be specific and descriptive about what you want Include details about style, mood, colors, and composition. Mention specific elements you want in the image, specify the perspective or angle if relevant
Example prompts:
“A modern office workspace with large windows, natural lighting, minimalist desk setup, plants, and a city view”
“Abstract geometric pattern in blue and purple gradients, suitable for a technology website background”
“Professional product photography of a coffee cup on a wooden table with morning sunlight”
AI Model
DigiBlocks Pro supports three OpenAI image generation models, each with different capabilities:
GPT-Image-1
Latest and most advanced model, supports up to 10 images per generation, offers the most control over output format and quality and provides options for transparent backgrounds. Best for professional and commercial use.
If you see an error message asking to verify your company, just follow the link and make the verification, once accepted by OpenAI, you’ll be able to use this model.
DALL-E 3
High-quality image generation, produces one image per generation, excellent at understanding complex prompts and best for creative and artistic images.
DALL-E 2
Previous generation model, supports up to 4 images per generation, lower cost per image, good for quick iterations and testing but limited size options compared to newer models.
Number of Images
Control how many variations to generate with a single prompt.
GPT-Image-1: 1-10 images
DALL-E 3: Fixed at 1 image
DALL-E 2: 1-4 images
Generating multiple images allows you to choose the best result from several variations. Keep in mind that each image counts against your API usage.
Image Category
Add context about the style or type of image you want to generate. These categories enhance your prompt with additional styling instructions:
None – No additional style modifiers
Photographic – Realistic photography style with natural lighting and composition
Vector – Clean vector art style, ideal for illustrations and icons
Background – Optimized for use as website or content backgrounds
Handmade – Artistic, hand-crafted appearance with texture
Digital Art – Modern digital illustration style
Product – Professional product photography aesthetic
3D – Three-dimensional rendered appearance
Type
Further refine the composition and technical style of your image:
None – No specific composition style
Landscape – Horizontal composition, wider than tall
Macro – Close-up, detailed view of subject
Portrait – Vertical composition, ideal for people or vertical subjects
Long Exposure – Motion blur and light trail effects
Size
Select the dimensions for your generated image. Available sizes vary by model:
GPT-Image-1:
1024×1024 (square) 1024×1536 (portrait) 1536×1024 (landscape)
DALL-E 3:
1024×1024 (square) 1024×1792 (portrait) 1792×1024 (landscape)
DALL-E 2:
256×256 (small square) 512×512 (medium square) 1024×1024 (large square)
Choose sizes based on where you plan to use the image. Larger sizes provide more detail but take longer to generate.
Quality
Control the rendering quality and detail level of generated images.
For GPT-Image-1:
Auto – Automatic quality selection based on prompt
High – Maximum detail and quality (takes longer, uses more credits)
Medium – Balanced quality and generation speed
Low – Faster generation with reduced detail
For DALL-E 3:
Standard – Good quality, faster generation
HD – Enhanced detail and quality
Note that higher quality settings consume more API credits and take longer to generate.
Image Style (DALL-E 3 Only)
Choose between two stylistic approaches:
Vivid – Bold, dramatic images with high contrast and saturation
Natural – More realistic, subdued appearance with natural colors
This setting only appears when DALL-E 3 is selected.
Output Format (GPT-Image-1 Only)
Select the file format for your generated images:
Auto – System selects optimal format
PNG – Lossless format, supports transparency, larger file size
JPEG – Compressed format, smaller file size, no transparency
WEBP – Modern format, excellent compression, supports transparency
This setting is only available when using the GPT-Image-1 model.
Output Compression (GPT-Image-1 Only)
Control the level of compression applied to images:
High – Maximum quality, minimal compression, larger files
Medium – Balanced quality and file size
Low – Maximum compression, smaller files, reduced quality
This setting affects file size and image quality. Choose based on your needs for quality versus page load speed.
Background (GPT-Image-1 Only)
Specify background handling for your images:
Default – Standard background as determined by the AI
Transparent – Removes background, creating a transparent PNG (ideal for product images and graphics)
Opaque – Forces a solid background
The transparent option is particularly useful for creating logos, product images, or graphics that need to blend seamlessly with your website design.
Generating Images
After configuring all settings:
- Review your prompt and settings
- Click the Generate Now button
- Wait while the AI generates your images (this may take 10-60 seconds depending on settings)
- A loading indicator will appear with a message: “Generating images, please wait…”
Generation time varies based on:
Selected model – Quality settings – Number of images requested – Image size
High-quality DALL-E 3 and GPT-Image-1 images typically take longer to generate than standard quality images.
Working with Generated Images
Once generation completes, your images appear in the results area on the right side of the modal.
Save to Library
Click the save icon (floppy disk) to add the image to your WordPress Media Library without using it immediately.
Use Image
Click the Use Image button to save the image to your Media Library automatically and insert it into the current block.